


Unlike the missions before it, High Price to Pay features two paths, but both of them lead to the same finish line, it just depends on who gets to reach that finish line still breathing. Tragedy strikes in this Starfield mission, so it’s best to prepare and stock up with a save file, plenty of Aid, ammo, and the best guns that the player can get their hands on.
This article will contain heavy spoilers for Starfield's High Price to Pay mission in both written content and the images shown.
Place The Artifact At The Lodge
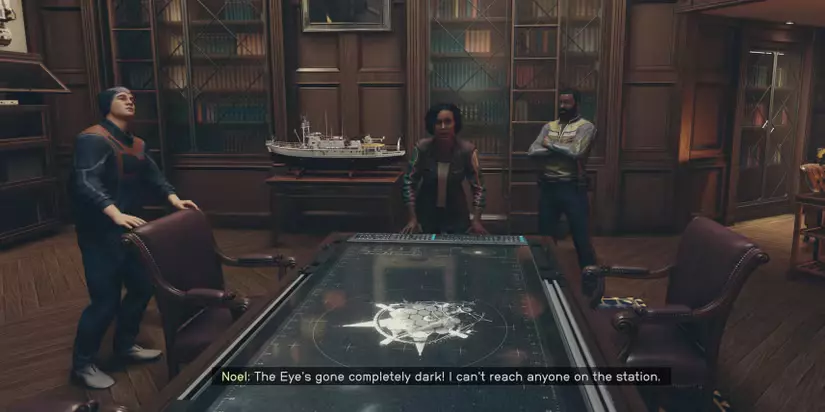
From the moment players place yet another Artifact at the Lodge, they will immediately get a communication from Vladimir from The Eye. At this point, The Lodge is closed, and players cannot leave. They must speak to Noel to continue the mission. Vladimir will tell the Constellation group that the Starborn has attacked, and one of them is critically injured and in need of medical assistance as soon as possible. To make matters worse, this Starborn is revealed to be The Hunter, who some players may have seen hanging out at bars and saloons across the galaxy, spouting philosophy.
Depending on what path the player takes, depends on which character dies, so now may be a good idea to save, or, prepare to say goodbye to a beloved companion forever. The following guide will show both paths and the fate of the characters involved. It is worth noting, that despite the death of specific characters, the story will not change depending on who dies.
Path One: Defend The Lodge
If players choose to stay and fight, all they have to do is wait in the Lodge without going near the front doors. With their gun at the ready, they can wait for the Hunter to break in. But a trained killer such as this manages to use camouflage to use Walter as a hostage and begins attacking the player and the Constellation at the Lodge whilst Noel desperately disassembles the Artifact and begins to run.
After Noel has taken all the Artifact pieces, she and the rest of the Constellation members will run down to the basement and through to The Well. From here, players should follow Noel, even whilst being chased by The Hunter. It’s wise to not engage in combat, and to simply keep running, as the Hunter cannot be stopped, and will easily kill the player and NPCs that dare shoot at them, so keep healing items at the ready.
After the chaos in The Well, players will need to run to the Spaceport of New Atlantis and escape aboard their ship. The Hunter will not stop pursuing, and players should run to their ship as fast as they can and fly off into space. From here, the Hunter will be in their ship, the Scorpius, where they will tell the player that they are going to stop pursuing them. This gives players the new task of venturing to The Eye to save their friends.
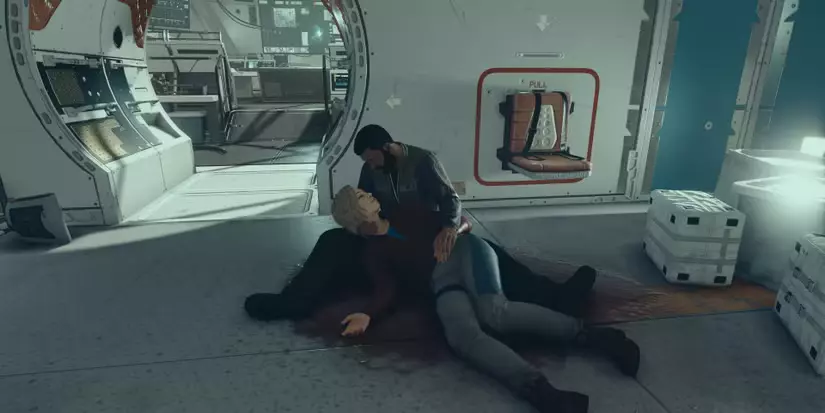
As players make it to The Eye, they will see that they are too late. Most of their companions are injured, but among the crew, there has been a fatal incident, and the character with the best relationship with the player in Starfield will be dead. This means that players may have lost their favorite character or Spouse.
After helping the injured crew back to their feet, players have no time to mourn as they board their ship once more and construct the Armillary, the new name for the pieces of the Artifact. Players have the choice of carrying it, building it on their ship, or using an outpost.
From here, players need to return to the Lodge and listen to Matteo, who will provide players with the next main quest in Starfield.
Path Two: Go To The Eye
If players want to save their favorite companion in Starfield, then they will need to follow the path that lets them go to The Eye instead of defending the Lodge. All players need to do is run to the front door before The Hunter attacks. In doing so, the companion with the lowest relationship (in this case, Barrett), will ask players that it’s a bad idea to leave, and he will have no choice but to barricade the front door. This means that if players do leave, there’s no turning back.
Players can rush straight to the Starport, and fly directly to the Eye to dock it and check on their crew. On board, they will find that all companions are injured, but none of them are dead. This means players have succeeded in saving their favorite follower. Once everyone is up on their feet, players need to head to the Lodge and see the casualty that has struck Constellation.
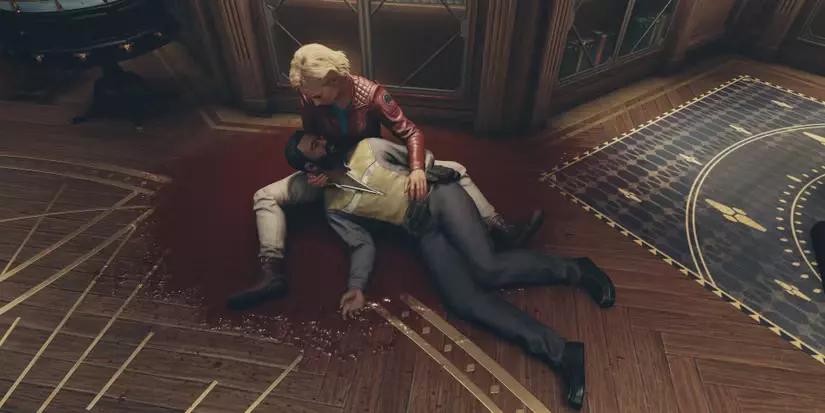
After picking everyone up, players need to head down to the basement and into The Well to find Noel, who had run off and hidden with the Artifact. From here, a repeat of the first path will play out, and players will need to fight and escape from The Hunter as they cause chaos in the streets of New Atlantis.
Players will have to flee to their ship, where the Hunter on their Scorpius ship will provide a gift to players who fought to impress them. From here, a quick trip to the Eye to inform Vladimir of the death in the Lodge is necessary to continue. After, players will have the Artifact pieces on their person, and they can choose whether to store them on the ship, carry them, or leave them at an outpost. Either way, they need to head back to New Atlantis and walk past the devastation caused by the fight with the Hunter to reach the Lodge and listen to Matteo. This concludes the High Price to Pay quest, and both paths that will see players lose their favorite or least favorite companion in Starfield. There is no way to save one, and a life must always be taken, so players should choose wisely who they want to lose by building a relationship with their team members. Not even console commands can raise the dead in this case.
How To Get Dead Companion’s Gear
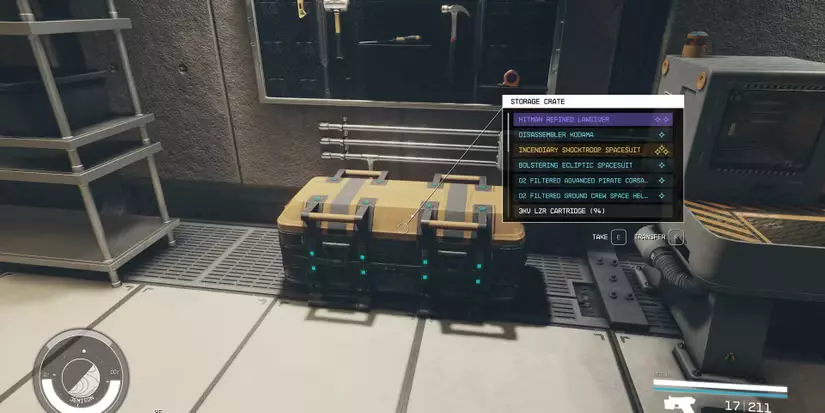
If players have lost a companion whom they had traded gear with, then they need to head down to the basement of the Lodge to find a storage crate that holds all of their items. Everything that this companion died with will be in here, including the outfit that they wore, meaning players can get their hands on unique clothing in Starfield if they let characters like Sam Coe die instead.
Copyright reserved. Unauthorized reproduction is prohibited.